No Images Found!
COST BREAKDOWN:
- A plastic storage box, 91 x 65 x 35 (R100) – bigger will cost more, size is up to you. Mine is big enough for one pack up rump steaks.
- Netting (R7, if needed).
- Glue or self adhesive tape – use your cheapest option or opt for the removable option but remember the self adhesive tape costs R20 / m and works out to +- R70 for 3.5m. Choice is yours.
- A fan (R49–R600). Please see
Portable Rechargeable Handheld Fan – Mrs Mac only R49 - Dowel stick (R22).
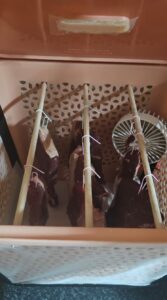
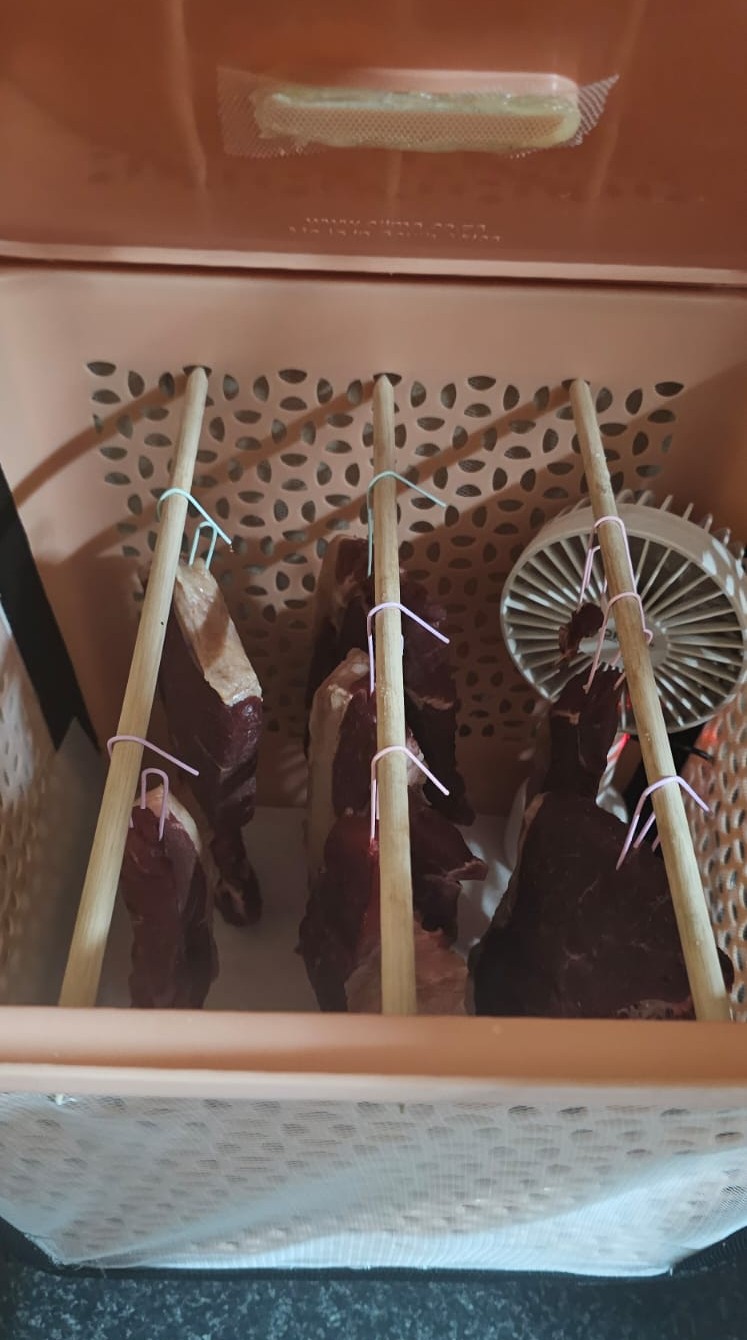
I’ve successfully made my own biltong box! It’s crafted from plastic but already had a netting pattern that required fine tulle for added protection – you can also opt for a normal plastic storage box, without any ventilation. I secured the tulle with self-adhesive Velcro strips. To ensure durability, I added a band over the edges to prevent the stickiness from seeping through and reinforced it with a glue gun. I meticulously covered every spot where insects might enter for maximum prevention.
The box is just over 30 cm wide, so I bought a 90 cm dowel stick and cut it into three 30 cm pieces. Using a thick sharpener, I sharpened the edges, allowing them to fit seamlessly into the existing netting holes. The dowels fit perfectly due to the pre-installed netting holes, making setup a breeze.
Before hanging the biltong, it’s crucial to place a clean sheet of fish paper, brown paper, or even newspaper at the bottom of the box to catch drippings.
I initially considered adding a lightbulb for heat, but the one I found was too big for the small size of my box. To avoid overheating the meat, I decided against using a bulb altogether.
For airflow, I use an Orico desktop fan that is both compact and portable. I purchased this fan from our supplier several years ago, and it has proven to be incredibly versatile. I’ve used it on my desk and even on my bedside table, showcasing just how handy it is. For the biltong box, I threaded a USB cable through one of the plastic holes and carefully cut a small slit in the tulle to allow the cable to pass through seamlessly.
For the meat, I opted for simplicity: no vinegar or spices—just a generous coating of pink Himalayan salt. For those experimenting with flavors, coriander and garlic could be great additions, but I skipped these to keep the recipe carnivore-friendly.
To hang the biltong, I purchased covered paper clips, which work well for this purpose.
DIY Biltong Box Shopping List
Materials for the Box:
-
- Plastic container or box (~30 cm wide or larger)
-
- Fine tulle or netting for insect protection
-
- Self-adhesive Velcro strips
-
- Glue gun with glue sticks
-
- Fish paper, brown paper, or newspaper for the base
Drying Rods:
-
- Wooden dowel sticks (e.g., 90 cm length, cut to fit your box size)
-
- Sharpener to taper edges for fitting into holes
Airflow & Heat:
-
- Portable desktop fan (e.g., USB-powered Orico fan)
-
- Optional: Light bulb (choose one that’s suitable for your box size)
Drying Time:
-
- 5 – 11 days, depending how thick your meat is – I used smaller pieces, not necessarily thin
(with a light bulb, drying time is reduced to as from 4 days)
- 5 – 11 days, depending how thick your meat is – I used smaller pieces, not necessarily thin
Tools:
-
- Drill or cutter for creating holes
-
- Measuring tape
Meat & Seasoning:
-
- Meat (e.g., beef or game meat)
-
- Pink Himalayan salt
-
- Optional: Coriander, garlic, or other seasonings (if not on a carnivore diet)
Hooks for Hanging:
-
- Covered paper clips or small hooks
NOTES:
So for under R200, you can have your very own biltong box. This can be a worthwhile and cost-effective DIY project.
One thing I didn’t like about cheaper commercial biltong boxes, like the one I owned a few years ago (R399), was their fragility—they collapsed easily and cracked. In contrast, my DIY box is made from a sturdy storage container that won’t crack or collapse under pressure.